
Flutter 2.0 was released on March 3, 2021. So if you downloaded Flutter before this date and have yet to upgrade Flutter, this guide will help walk you through it. If you downloaded it on or after, then you are already using Flutter 2.0.
Flutter 2.0 updated many of its existing widgets and it introduced a new feature called null safety, which we will also cover in this migration guide. The main changes were the buttons because they had a name change and the way they worked was also changed. Everything else, works pretty much the same way with additional features.
Channel
Before we dive into updating Flutter, we first need to make sure we are now using Flutter's stable channel. We were using a beta channel before because we wanted to use the WebApp, which was in development and hence it was in the beta channel, but with Flutter 2.0 the WebApp is now stable. By stable, it means that pretty much everything works when we switch from a Mobile App to a WebApp.
Checking Channel
In your terminal, type and run the following command:
flutter channelThis should tell you what channel you're currently on. We want to make sure that you are on the stable channel before performing an upgrade.

Your terminal should show the following after running the above command. The star (*) indicates which channel you are currently using. If it is on stable, you're set for the next step and proceed to the subtopic, "flutter upgrading." Otherwise, follow the "changing channels" subtopic.
Changing Channels
If your channel is not stable, then we will run the following command to do so:
flutter channel stableThis will switch the channel to stable and it will switch the Flutter SDK release channels you will be getting updates from. You will see a lot of red text that starts with git:.
Flutter Upgrading
Now that we are using the stable channel, we will perform the upgrade.
Run the following command on your terminal:
flutter upgradeThis will take some time to upgrade. Once it is done, restart your VS Code by exiting out and opening the code again.
CocoaPods
CocoaPods are used to manage your dependencies for iOS.
When we have a dependency in Flutter (located in pubspec.yaml) it correlates to what CocoaPods we need for the iOS side of the app; therefore. if this file is messed up or missing, the app will not be able to run and so we need CocoaPods to be up-to-date.
Checking CocoaPods Status
To make sure that we do not need any updates, we will let flutter check. To do this, run the following command in your terminal:
flutter doctorThis command will check everything you need in order to have Flutter working, including CocoaPods. Once it is finished running, a status will should pop up like the following:

If everything have a green check mark, you are already to proceed to the next part of the article.
If you have a [X] next to the following:
Android Toolchain
Chrome
Android Studio
InelliJ IDEA
and you plan to only test your code on iOS and write code on an Apple device, you do not need to worry about resolving it.
You do not need to worry about the above components because they are used for Android testing. If you are developing on Windows, then you need these components to have a green check mark because iOS and Xcode is not available on Windows.
If you have a [X] next Xcode and you are on an Apple device:
Update Xcode.
Make sure iOS Simulator is installed.
If your CocoaPods are outdated, you will see a message similar to the following next to Xcode in the status message.

Update it by running the command
sudo gem install cocoapodsAfter, we want to check that this is no longer an issue by running the command
flutter doctor If there is a check mark on Xcode, then we are all set.
Null Safety
Null safety is used when there is a chance that we might have a null value in one of our core data variables. By null, it means that the value does not exist.
Car Null Safety Example
Non-Nullable
All cars need gas in order to run. So it need a variable that calculates how much mileage you have left (how many more miles a car can run before it stops), the value of gas must be some number from 0 to 100. That number needs to exists, this is called non-nullable because this number needs to exist or it will cause something to crash.
Nullable
Car's can use 2 different types of fuel: diesel or gasoline. A car running on gasoline cant use diesel; a car running on diesel cant use gasoline. So for every car, the diesel or gasoline can be null because they can only use 1 type of fuel.
If a car uses gasoline, then diesel can be null.
If a car uses diesel, then gasoline can be null.
They can be null because we don't need to use it, so if one is null it must be the other.
Code Example
int? id = null   // can be null

int id2 = 100    // cannot be null
The ? in the type of variable tells Dart that whatever you store in it can have the null value. Otherwise, Dart will not like it and not run your code.
This helps simplify code because if Dart knows that id2 cannot be null, then we do not need to check if there is a number in it or not. It saves us time. Using the same car example, if Dart knows that gasoline cannot be null, then we do not need to check if we're using either gasoline or diesel because gasoline cannot be null, so it must be gasoline.
You might be thinking, what is Dart? I thought we were talking about Flutter?
Simply put, Dart is the programming language responsible for using Flutter and actually build the app. Comparing this to a house, Flutter are the materials to build the house and Dart are the construction workers responsible for putting everything together.
Does it make a little more sense? If not, reach out to any of the technical team members at WEqil School. They will be glad to give you more examples.
Widget Upgrades
The main widgets that have breaking syntax are the buttons. They are:
RaisedButton → ElevatedButton
FlatButton → TextButton
Outlined Button → *no name change*
Only the first two buttons had their names changed and we did not use Outline Button, so that button will not be included in this guide.
RaisedButton → ElevatedButton
In your project, make sure to change the name of RaisedButton to be ElevatedButton.
In the original RaisedButton, we were able to style the button right away by passing in a button color and a text color. In the example below, we were able to apply these colors inside of a RaisedButton by specifying color and textColor.
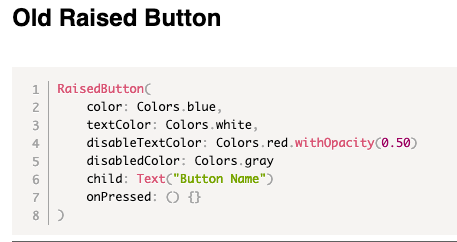
In Flutter 2.0, this is changed. Instead of being able to specify a color and textColor inside of the button right away, we now have a new parameter called style and inside of style, we give the button a ButtonStyle object and inside of this object, we specify its color.
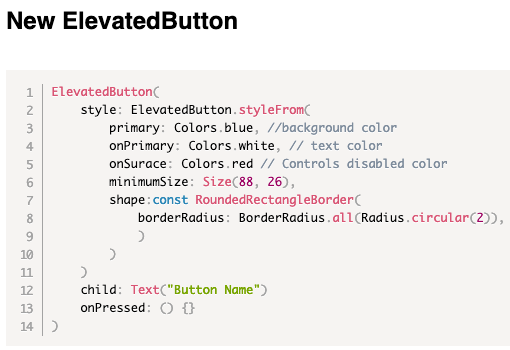
As you can see, things are pretty different with styling. This new syntax gives us more freedom of controlling the button. Before, we needed to put the button inside of a Container widget to change its size. Now, we can do it directly inside of this button and we can even give it a shape.
That is too much typing. If I want to use the same style for multiple buttons, do I have to retype all of that?
Remember, the ButtonStyle is an object, that means we can create 1 copy and reuse this style. This is what makes this new button so much better than the original. We can now reuse style for different buttons. To do this, let's take a look at the example below.
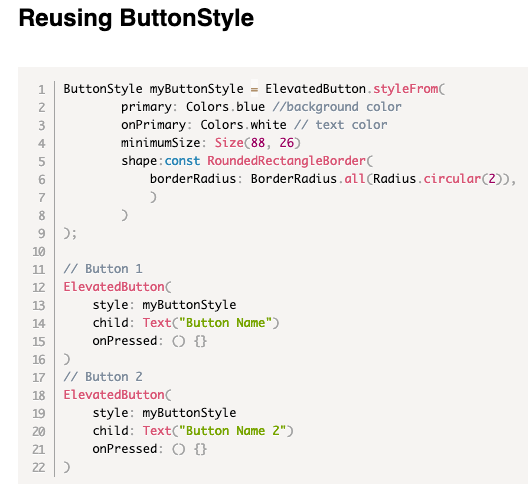
First, we defined a button style and saved it inside of a variable called "myButtonStyle." Now we can pass "myButtonStyle" into the style parameter of multiple buttons.
Remember, the style parameter takes in a ButtonStyle object. Our "myButtonStyle" IS a ButtonStyle object.
FlatButton → TextButton
The transition of FlatButton to TextButton is the same way as RaisedButton in that we replace the ability to style the button right inside of the widget to having need of a ButtonStyle. The code examples below will show you how to transition this. It is a bit different because the FlatButton was designed for you to have more styling option. For example, being able to change the color of when the button is pressed, when it is disabled, when it is enabled, etc.
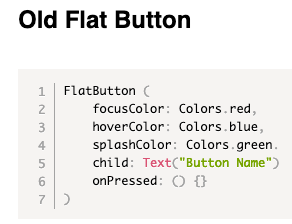
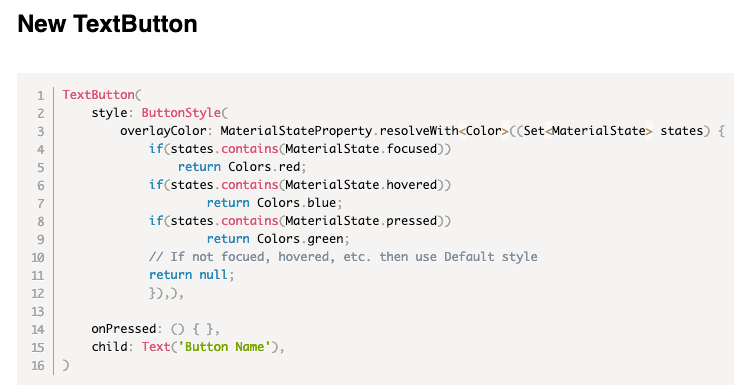
focusColor -> Color of the button when you can use it.
hoverColor -> Color of the button when your mouse is over it.
spashColor -> color of the button when you click on the button.

Comentarios